
Shipping a full fairing kit overseas is routine for some sellers and a first-time problem for others. A complete kit is several large, curved panels, each molded to fit one specific model and finished in paint that marks and cracks under pressure. Between seller and buyer the panels travel thousands of miles, often crossing national borders.
Three things decide how that trip ends: cracked tabs, how the kit was packed, and what you can prove if something breaks.
Cracked tabs are the most common damage. A tab is a thin mounting point, and it breaks when a panel shifts inside its box. How much a panel can move depends on the packing: foam density, box strength, and the gap left between panels all matter. If something does arrive broken, carriers and insurers weigh photographs, timestamps, and inspection records when deciding who pays.
This guide is for three readers: vehicle owners, motorcycle enthusiasts, and people working in shipping and logistics. It covers how tabs fail, compares packing methods, and lists the records a strong claim needs. Good cross-border logistics planning keeps a fairing kit moving without costly delays.
Why Cracked Tabs Happen: The Weakest Point Theory
A fairing kit is built to survive the road, not the mail. The painted panels get the attention, but what decides whether the shipment arrives intact is the small protruding mounting point that bolts each panel to the frame: the tab. On any fairing kit overseas shipping job, check the tabs first. They are the thinnest, most cantilevered, and most load-exposed features on the whole assembly. Panels scuff; tabs fail structurally, and that failure is almost always mechanical rather than cosmetic.
Vibration: The Slow Fatigue Agent
A container or a truck bed is a rough place to spend a week. Every pothole, engine cycle, and rail coupling sends energy into the crate. Because tabs jut out from the panel, they act like a diving board and amplify that motion instead of absorbing it. Over days of transit, repeated flexing at the tab root opens micro-cracks that grow until the tab snaps off. Fatigue cracks are often hidden behind packaging that still looks untouched.
Stacking Pressure: Weight With Nowhere to Go
Tabs point outward, so they take any downward load first. Stack cartons three or four high and the weight lands on the few square millimeters at each tab. A flat panel spreads force across a wide area; a tab funnels it into one small joint, which is how stress fractures start.
Temperature Swings: Expansion Without Room to Move
ABS and fiberglass expand and contract with heat. Cross an ocean in a sealed container and the interior can swing from freezing nights to hot afternoons. If a tab is bolted tight against a rigid bracket, that movement has nowhere to go and the material tears at its weakest point. Customs adds another round of handling, and every delay and reload means more vibration cycles on the crate.
Weak Reinforcement: Where Manufacturing Leaves You Exposed
Not all tabs are equal. Thin webbing, sharp internal corners, and missing gussets at the base build failure into the part. Budget kits often skip reinforcement ribs, which means the tab was already weak before it was boxed.
| Cause | Mechanism | Typical Damage |
|---|---|---|
| Vibration | Cyclic flexing at the tab root | Fatigue cracks, snapped tabs |
| Stacking pressure | Point-load concentration on protruding tabs | Stress fractures at the base |
| Temperature swings | Constrained thermal expansion | Splitting along the joint |
| Weak reinforcement | Thin webbing and sharp corners | Premature failure under light load |
Those four rows point the same way: a tab concentrates stress. Treat it as the fragile part of the kit and the packing plan follows.
Packing Choices for a Full Fairing Kit
When you ship a full fairing kit overseas, the box is only as strong as what you put inside it. Fairings are large and thin, and their mounting tabs crack under sudden impact, which makes packing choices the one variable you fully control. Good motorcycle fairing kit packing is not about buying the most expensive materials. It is about matching the protection to the value of the kit, how fragile it is, and the route it takes.
Every packing method is a balance of three things: protection, cost, and weight. More protection usually means more material, and material adds both cost and weight. Weight matters because international carriers bill on actual and dimensional weight, so a heavier, bulkier parcel costs more to fly or float. A crate that survives a forklift but doubles your freight bill is not always the right call for repairable panels. The options:
- Single-wall cardboard box – the cheapest option, fine for one small panel, but it offers almost no crush resistance.
- Double-wall corrugated box – moderate cost and weight, and it handles stacking pressure far better for medium-sized kits.
- Custom wooden crate – maximum impact and puncture protection, but heavy and expensive to move across borders.
- Closed-cell foam wrap – lightweight and excellent against scratches and vibration, though it compresses under heavy loads.
- Bubble wrap layers – inexpensive cushioning that absorbs minor shocks, but it adds bulk quickly and inflates dimensional weight.
- Molded foam inserts – cradle each panel precisely to protect the tabs, yet they cost more and must be custom-sized.
- Corner protectors and edge guards – cheap insurance for the most vulnerable points, with minimal added weight.
- Stretch film over palletized kits – secures a full set for LTL freight, but it needs a rigid pallet underneath for support.
The trade-off is real. A wooden crate with molded foam gives the most protection but can triple both cost and weight. A double-wall box with foam wrap is the middle ground that suits most overseas motorcycle shipments; a single-wall box only makes sense when speed and low cost matter more than the risk of a cracked tab. Before you commit, pair the packing plan with solid cross-border freight planning so customs handling does not undo the work. Document the materials either way: photos of the layers double as claim evidence if a tab still snaps.
Packing Material Comparison Table
The materials you choose decide whether the kit arrives ready to fit or shows up with cracked tabs and cracked paint. The table below compares protection, cost, and weight before you seal the crate.
| Packing Material | Protection Level | Relative Cost | Added Weight | Best Use Case |
|---|---|---|---|---|
| Bubble wrap | Light | Low | Very low | Wrapping individual panels against scuffs |
| Foam wrap | Moderate | Low-Medium | Low | Cushioning painted surfaces and edges |
| Custom foam inserts | High | High | Medium | Immobilizing mirrored left/right fairings |
| Corrugated boxes | Moderate | Low | Low-Medium | Inner cartons for grouped panels |
| Rigid crate | Very high | High | High | Outer shell for air and sea freight |
| Corner protectors | Targeted | Low | Very low | Reinforcing fragile tab and corner zones |
Protection level here means resistance to impact and vibration, not waterproofing. Layer the materials: custom foam inserts with a rigid crate for high-value kits, or foam wrap and corner protectors when budget matters. Knowing the cross-border freight realities helps you match the packing to the handling the shipment will actually face.
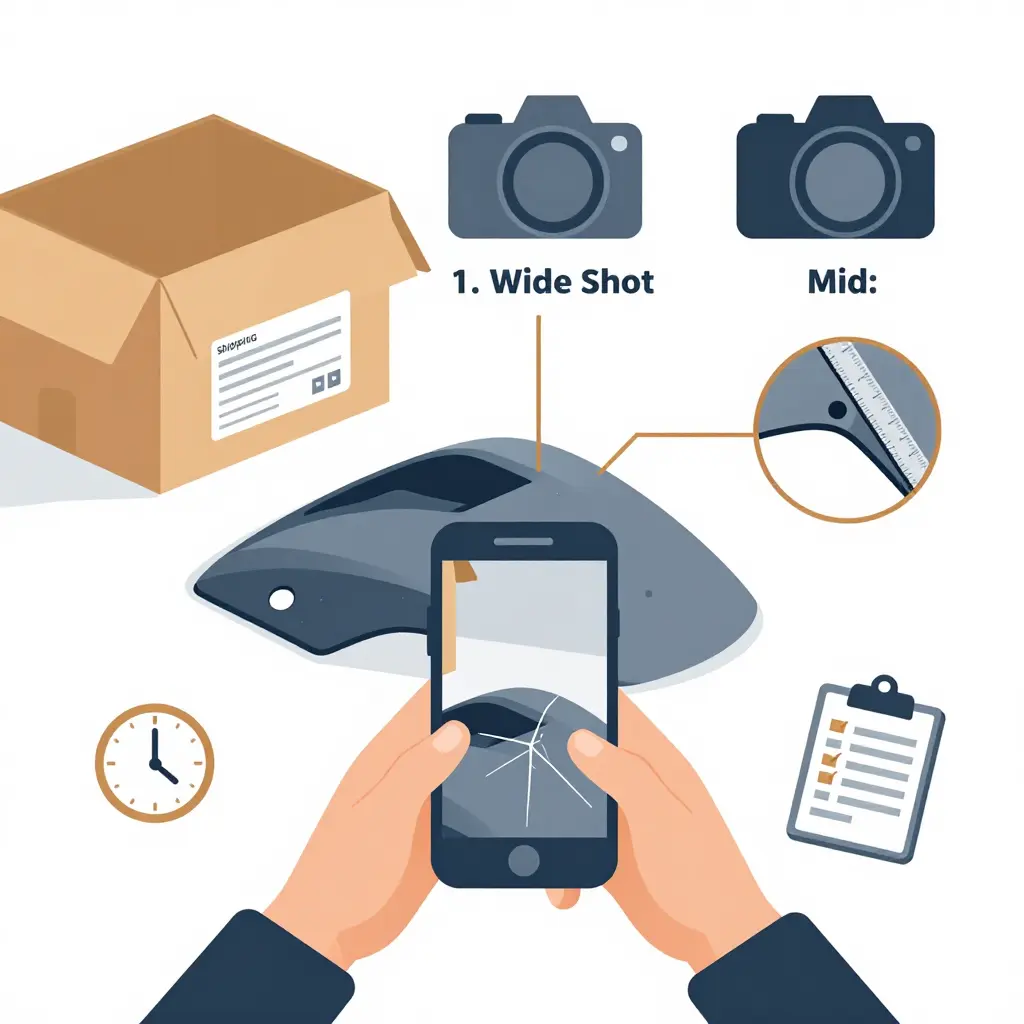
Inspecting and Documenting Your Fairing Kit on Arrival
When a full fairing kit finally arrives after a long ocean haul, the unboxing is your one chance to build a record. How you packed the panels decides what survived; how you document the arrival decides what you can recover. The claims process rewards owners who take the first ten minutes after delivery seriously.
Unbox in Sequence, Not in a Rush
Slow down before you cut the tape. Photograph the sealed carton from all four sides, then the shipping label and any crush marks, punctures, or water stains. Open the box only after that.
Keep the packing material, including foam blocks, corner guards, air pillows, and stretch wrap. It becomes part of your claim evidence and helps show whether the crate failed in transit or left the warehouse intact.
Take the panels out one at a time and lay them out in the order you lift them. That sequence lets an adjuster reconstruct how a tab cracked, and it keeps a pre-existing defect from being mixed up with fresh transit damage.
Aim the Camera at the Right Angles
Each damaged panel needs three shots:
- A wide shot placing the panel beside the open carton and shipping label.
- A mid shot showing the full panel and the failure location.
- A tight macro of the cracked tab, ideally with a coin or ruler for scale.
Shoot in bright, even light and keep your fingers out of the frame. Blurry photos taken only up close are the fastest way to lose a claim.
Let Timestamps Do the Talking
Turn on date and time stamps before you start. Photograph the whole sequence, from unopened box to finished inspection, ideally within 24 hours of delivery. A continuous, time-stamped record shows the damage was there when the kit arrived, not a week later after handling in your garage. Screenshot the tracking status with the delivery time so the two records line up.
Bring in the Carrier Inspection Report
If the carton shows obvious external damage, ask the carrier to inspect it before you unpack fully. A formal carrier inspection report carries more weight than photos alone and often decides the claim. Note the driver’s name, the tracking number, the seal number, and the exact delivery time, and ask for a written copy rather than a verbal summary.
If the shipment crosses a border, understanding how cross-border regulations shape freight claims sharpens the paperwork before it reaches an adjuster.
Keep the Record Consistent
Keep every photo, receipt, packing note, and inspection report in one folder, and back it up to the cloud. That consistency turns a cracked tab into a straightforward claim and links how you packed the kit to what you get back when something goes wrong.
An ideal kit is layered like this before it leaves the dock. From the outside in, each layer has a job:
- Outer box: The rigid shipping box that resists crushing and keeps the whole package square so it stacks cleanly in a container.
- Padding layer: The cushioning wrap that absorbs shock and vibration during ocean freight and rough handling.
- Reinforced fairing: The fairing panel itself, braced so its mounting tabs and clip points can’t flex or snap under load.
- Inner foam: The core filler that fills empty voids, stops the fairing from shifting, and keeps pressure off the vulnerable edges.
The layers step inward like nested rectangles for a reason: gaps are filled, nothing rattles, and impact energy spreads across several layers instead of landing directly on the tabs.
Assembling Your Claim Evidence for Cracked Tabs
A kit can survive 6,000 miles of ocean freight and still lose at the claims desk. The problem is rarely the damage; it is the paper trail. When a mounting tab snaps, the payout depends on how well you assemble claim evidence before, during, and after the shipment.
What to Photograph
Photos are the backbone of any claim evidence file. Shoot the fairing from four angles before packing, then photograph every cracked tab with a ruler or coin for scale. Wide shots should show the box, the labels, and the surrounding packaging so an adjuster can see how the kit was secured. Timestamp everything and keep the originals, not edited copies.
Which Documents to Keep
Start a folder the moment you book the shipment. Missing paperwork sinks more claims than missing parts.
| Document | Why It Matters |
|---|---|
| Commercial invoice | Proves declared value and item list |
| Packing list | Shows how each panel and tab was wrapped |
| Carrier forms / BOL | Confirms the carrier accepted the shipment |
| Photo set | Documents pre-shipment condition |
| Repair or replacement quote | Justifies the amount claimed |
Keep digital and physical copies, since cross-border shipping documentation is often requested in more than one format.
Time the Filing Right
Report damage on the day of delivery and note it on the carrier’s form before you sign. For domestic moves, many carriers ask for written notice within 24 to 48 hours, while a formal claim can be filed up to 9 months later. Air and ocean shipments run on tighter deadlines, so file as soon as the damage shows up instead of waiting for a perfect file.
Why Claims Get Rejected
- Signing a clean delivery receipt before inspecting the crate
- Filing after the notice deadline
- No photos of the cracked tabs from before shipping
- Claim values that do not match the invoice
- A missing or mismatched packing list
Close those gaps and the file argues your case for you.
Where Does the Damage Actually Come From?
Before you blame shipping for every cracked tab, it helps to know which risks cause most of the losses. The pie chart below breaks down the damage causes reported during overseas fairing kit shipping.
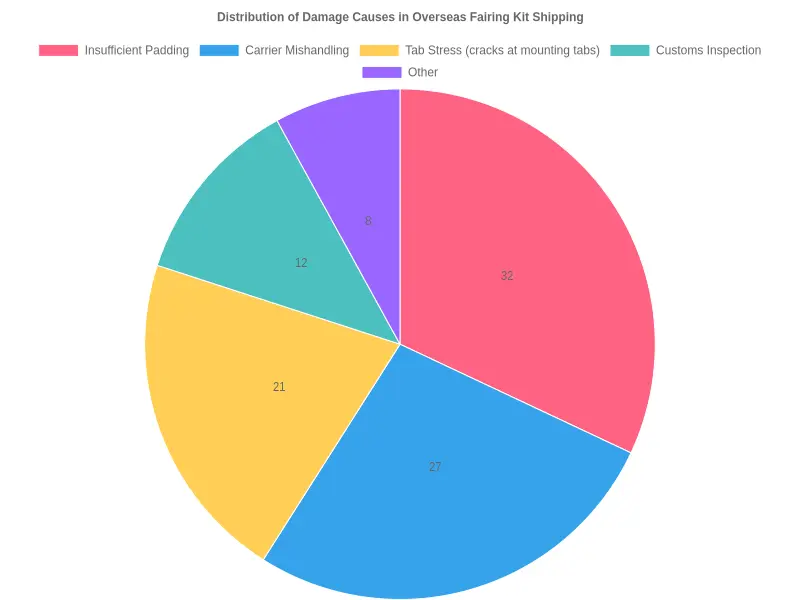
Reading the Chart
- Insufficient padding (32%) is the largest single cause, usually thin foam, missing corner protection, or fiberglass shipped in a box alone. It is also the factor you control most directly.
- Carrier mishandling (27%) covers drops, crushed pallets, and rough transfers between hubs. Once the package leaves the dock, your only leverage is choosing a carrier with a solid record.
- Tab stress (21%) covers cracks at the mounting tabs, the weak point on fairing panels. Even a well-packed kit can fail here if the tabs carry the weight of the box.
- Customs inspection (12%) is easy to overlook: opens, reseals, and manual handling during clearance can undo careful packing.
- Other (8%) covers weather, moisture, and mishandled returns.
What This Means for You
Nearly a third of all damage traces back to packing, so the largest slice of risk is one you can fix before the box ships. Tighter padding and tab reinforcement, plus a carrier that respects a fragile label, address the two biggest causes at once. On cross-border shipments, remember that inspections add handling steps; understanding those border-crossing logistics challenges helps you plan for what happens at the border.
Packing and carrier choice come first. Together they cover roughly 59% of reported damage before the shipment travels a mile.
Total Cost Breakdown: What Shipping a Full Fairing Kit Overseas Really Costs
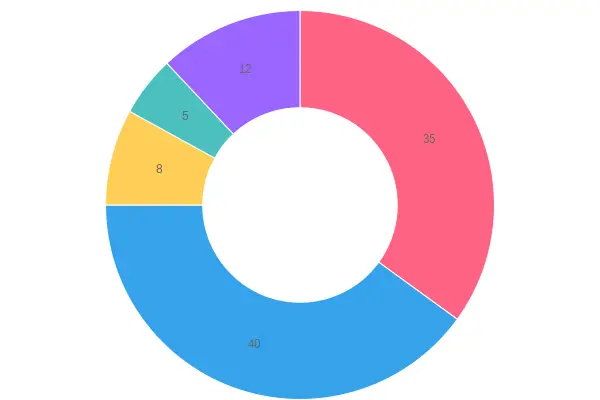
The product price catches your eye, but shipping a full fairing kit overseas is a stack of costs, and the sticker price is only the first layer. Add crating, freight, cargo insurance, and the possibility of a claim, and the extras add up to more than the kit itself.
The five line items that shape your invoice
| Cost Component | Typical Range (USD) | Share of Total |
|---|---|---|
| Fairing kit product price | $400 – $1,200 | ~35% |
| Packing and custom crating | $80 – $180 | ~8% |
| Freight cost (air or sea) | $250 – $700 | ~40% |
| Marine/cargo insurance | $25 – $90 | ~5% |
| Potential claim loss | $0 – $600 | ~12% |
Freight dominates the variable side, and it punishes careless planning hardest. Sea freight looks cheap per kilo until you add the crating a long ocean transit needs; air freight gets the kit there fast, but the premium can double your landed total.
Insurance is the smallest line at roughly 5%, but it is the cheapest protection you will buy. On a $900 kit, $45 of coverage is the difference between a footnote and a write-off. Claim loss is the other side: cracked tabs, scuffed panels, and missing hardware that turn a clean delivery into a dispute. Even a successful claim often pays less than the damaged part cost, because deductibles and documentation gaps eat the payout.
These economics follow the freight market at large. Trailer orders ripple through truckload margins, which is why rates rise when capacity tightens; periods of excess capacity in the trucking market push carriers to compete on price, and that window is worth timing. The trailer market crisis that forced manufacturers to adapt shows how supply shocks raise every downstream quote. Smart importers follow trailer purchasing strategies in a weak market: lock rates early, consolidate shipments, and never ship a fairing kit uninsured.
Conclusion
Shipping a full fairing kit overseas does not have to end in a snapped tab, a crushed side panel, or a denied claim. Three things hold the process together.
Preventing cracked tabs starts long before the box is sealed. Secure factory tabs with foam padding, brace the mounting points, and separate panels so they cannot shift against one another. Packing well means matching materials to the journey: rigid double-wall cartons, molded corner protection, and moisture barriers that survive changing climates and rough handling. Claim evidence is the safety net. Photograph everything before shipping, document weights and dimensions, keep the tracking trail, and photograph any damage honestly on arrival, because carriers rarely pay without proof.
Together they turn a risky international shipment into a predictable one. Reinforced tabs, sensible packing, and disciplined documentation lower the odds of loss and the work of chasing reimbursement. For teams linking this to larger freight and border problems, bridging border barriers during international shipping covers more.
Before the next overseas fairing kit leaves the door, inspect every tab, pad every panel, photograph every angle, and keep every receipt. That protects the investment no matter how far it travels.